iPhone 11 Screen, handle the ribbon cables with extreme care. These fragile cables connect the screen to the logic board; any damage could render your phone unusable. Opening your device will also break its water-resistant seals, so if you want to keep your phone water-resistant, you may need professional-grade tools to replace these seals properly.
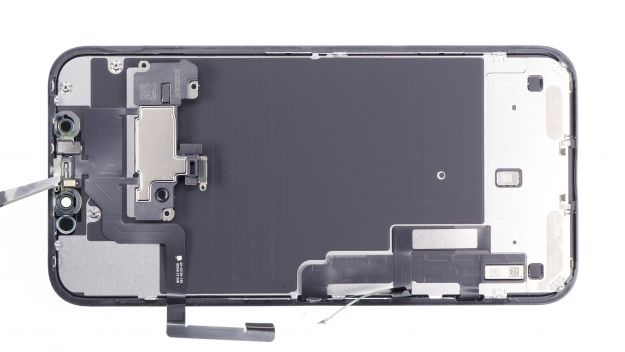
Table of Contents
Tools and Materials Needed
- Replacement iPhone 11 screen
- Pentalobe (P2) screwdriver
- Phillips #000 screwdriver
- Suction handle
- iOpener (or heat gun/hairdryer)
- Spudger
- Tweezers
- Opening picks
- Adhesive strips
Step-by-Step Guide to Repairing Your iPhone 11 Screen
Power Off Your iPhone
Turn off your iPhone 11 to prevent any potential short circuits during the repair. If the slider shows the message “Turn off”, you can wipe it from left to right. Your phone will now shut down completely.
Remove the Pentalobe Screws
On the lower side of the housing, to the right and left of the Lightning connector, you will see two Pentalobe screws. Utilize a pentalobe (P2) screwdriver to carefully remove the two screws located at the bottom edge of the iPhone near the charging port.
Remove the screen
Use a heat gun or hairdryer on the edges of the display for about 1-2 minutes. Alternatively, you can use an iOpener to heat the edges. Attach a suction handle near the bottom edge of the iPhone and gently pull upwards to create a slight separation between the display assembly and the rear case, the display assembly from the bottom edge, opening the iPhone like a book. Be cautious not to completely detach the display, as cables still connect it. As you create a gap, insert a plastic opening tool or a spudger into the gap to gently pry around the edges and loosen the adhesive. Be cautious not to damage the display cables, which are connected at the top.
Disconnecting the all connectors
The Flex cable of the earcup accommodates various sensors which are led through several openings of the display. The flex cables and the display controller are glued to the back plate. Moreover, the plate is hooked to the lower side. Try not to damage the black silicone seal surrounding this and other board connections. These seals provide extra protection against water and dust intrusion.
Transfer Components from Old Screen to New Screen
If your replacement screen doesn’t include small components like the earpiece speaker and front camera assembly, you’ll need to transfer them from the old screen.Use a Phillips screwdriver to remove the screws securing these components on the old screen and carefully transfer them to the new screen.
Connecting the display
Align the new screen with the iPhone frame and reconnect the display and digitizer cables.Reconnect the battery, and secure the bracket over the connectors using the screws you removed earlier, the replacement display assembly with the iPhone body. Connect the display cable to the logic board first, followed by the digitizer cable and front sensor assembly connector
Be patient when prying the screen off to avoid damaging internal components.Use a magnetized tray to keep the screws organized as there are several small screws in this repair.
How to iPhone 11 Screen Replacement
These fragile cables connect the screen to the logic board; any damage could render your phone unusable. Opening your device will also break its water-resistant seals, so if you want to keep your phone water-resistant, you may need professional-grade tools to replace these seals properly.
ReformTech is a highly reliable Laptop and Smartphone repair service provider that offers on-site repairs for various brands. We specialise in fixing hardware issues, including screen replacements, keyboard replacements, RAM upgrades, SSD upgrades, and even motherboard repairs. Contact us at 8100257620 for fast and efficient service.