Comprehensive Guide to iPhone 7 battery Replacement
The iPhone continues to be one of the most widely used smartphones, and it’s not hard to see why. Apple products are designed for accessibility, ease of use, and seamless integration with other everyday devices. However, one of the common challenges iPhone users face is maintaining optimal battery life. The iPhone battery is a consumable component with a limited lifespan, which means it will require replacement at some point to ensure continued performance and usability.
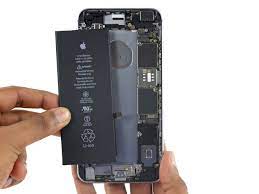
Table of Contents
At Reformtech, we understand the importance of having a reliable smartphone, which is why we offer quick, reliable, and affordable iPhone battery replacement services at your doorstep. When your iPhone battery stops functioning as expected, it can be a major inconvenience, affecting your daily routine and productivity. This guide outlines the steps involved in replacing an iPhone battery, ensuring a smooth process while maintaining the integrity of the device.
Step-by-Step Guide to iPhone Battery Replacement
1. Preparing for the iPhone 7 battery Replacement
Before starting, ensure that your iPhone is turned off to prevent accidental damage. Gather the necessary tools, including:
- A heat gun, dehydrator, or heat mat
- A metal spudger, playing cards, or guitar picks
- A small Phillips screwdriver
- Tweezers with blunt tips
- Replacement adhesive or regular tape
2. Loosening the Adhesive
To begin, heat up the device’s interior adhesive strips using a dehydrator, heat gun, or heat mat. Heat guns are the quickest option, but caution is required to avoid overheating, which could damage internal components.
3. Removing the Screws
Locate and remove the screws on the bottom edge of the iPhone, positioned on either side of the Lightning port. Keep these screws in a safe place for reassembly later.
4. Separating the Display
Using a metal spudger, slowly and carefully separate the screen from the phone’s body. Start at the bottom edge near the Lightning port and proceed gradually. Be cautious not to push the tool too deep into the device to prevent damaging internal components.
For additional support, playing cards or guitar picks can be used to continue separating the adhesive from the sides and top of the device. The screen will eventually open like a book from the left side, but keep in mind that the display flex cable remains attached to the battery, requiring careful handling.
5. Disconnecting Internal Components
Next, locate and remove the silver EMI shield on the mid-right side of the phone. It is secured with screws, one of which is longer than the others—take note of their placement for reassembly.
Once the shield is off, use a spudger to disconnect the battery from the logic board. Then, carefully disconnect the display connector flex cable using the spudger.
6. Removing Additional Components
Unscrew the head screws securing the shield over the front panel sensor assembly connector, which is the silver shield near the top with the flex cable extending downward.
Remove all screws surrounding the LCD shield, including the head screw at the bottom edge.
7. Removing the Old iPhone 7 battery
Using the point of a spudger, lift the battery connector out of its socket on the logic board. Gently bend the connector cable up to prevent it from reconnecting and supplying power to the device.
Disconnect the Taptic Engine connector from its socket. Then, use tweezers to peel back the adhesive strip on the lower edge of the iPhone 7 battery. If any alcohol solution remains inside the phone, carefully wipe it away or allow it to air dry before proceeding.
8. Installing the New iPhone 7 battery
Unlike the original iPhone 7 battery, the replacement may not come with adhesive. In this case, take a piece of tape, form a loop with the sticky side facing out, and place it in the same position as the old adhesive. Firmly press the new battery down to secure it in place.
9. Reassembling the iPhone
Once the new iPhone 7 battery is installed, begin reassembling the device by reconnecting all flex cables, replacing shields, and securing all screws in their original locations. Ensure that the screen is properly aligned before pressing it back into place.
10. Powering On and Testing
Turn on the iPhone and verify that the new iPhone 7 battery is recognized by the system. The software will notify you when the replacement process is complete. If you experience excessive battery drain after installation, a simple reboot can often resolve the issue without any data loss.
Benefits of Replacing Your iPhone Battery
- Extended Battery Life: A new iPhone 7 battery ensures optimal performance and longer usage time.
- Improved Device Performance: Your iPhone will run more efficiently with stable power output.
- Cost Savings: Replacing the battery is far more economical than purchasing a new device.
At Reformtech, we prioritize customer satisfaction by providing high-quality iPhone battery replacements with expert care. Contact us today for professional assistance and restore your iPhone’s battery life efficiently!
Looking for expert Apple mobile repair? At Reformtech, we provide top-notch repair services to get your iPhone back to peak performance. Whether it’s screen repair, battery replacement, or any other issue, we deliver the Best Service in Kolkata at Behala Chowrasta with guaranteed quality. 📱🔧 #Reformtech #AppleMobileRepair #BestServiceInKolkata #iPhoneRepair
Need a reliable service center near you? ReformTech is a trusted Laptop and Smartphone repair service provider, offering on-site repairs for various brands. We specialize in fixing hardware issues, including screen replacements, keyboard replacements, RAM upgrades, SSD upgrades, and motherboard repairs.
📞 Contact us at 8100257620 for fast and efficient service.
#AppleServiceCenter #MacBookRepairCenter #LaptopServiceCenter #iPhoneRepairCenter #MacBookRepairCenter #DellRepair #LenovoRepair #HPRepair#AsusRepair#AcerRepair#BestRepairService#MacBookServiceCenter#iPhoneServiceCenter#AppleRepairCenter#MobileServiceCenter